For my regular visitors, if you find that this blog hasn't been updating much lately, chances are pretty good I've been spending my writing energy on my companion blog. Feel free to pop over to Moving On, and see what else has been going on.

Sunday, December 30, 2007

Making Tourtierre

After sharing the recipe, I figure sharing the end results might be in order, too. :-)


This year we used about 5-6 pounds of ground meats for out tourtierre - which seems to be just enough to fit into my large stock pot. :-D We have our own preferred blend of meats to use - experiment to find what combination you like best. Whichever you choose, try to get the leanest cuts you can find. Of the blend you see here, there's almost no fat at all. You'll see why that's important, later.
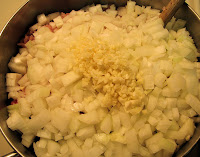


Next, we add in the equivalent of 1 small onion and 1 clove of garlic per pound of meat. Or 2 cloves of garlic per pound. It's not like you can have too much garlic, right? ;-)

With only a few onions to cut up, I didn't bother bringing out the food processor. That was probably a mistake - chopping onions is not a good time to discover a cut on the side of my thumb! Oh, and I was reminded that the effect of onions is amplified for people who wear glasses. Ouch!!

Time for the spices and herbs! Go ahead and get creative. Experimentation in the kitchen is a good thing. :-D

Finally, add the water - about a half cup per pound of meat or less. The water is one thing that doesn't need to increase exponentially when you double, triplet, or sextuple a recipe. ;-)

Next, bring the water to a boil and cook, mixing frequently to break up the clumps of meat. With a pot as full as this, I let it simmer more than boil until the meat was cooked through, then I increased the heat and boiled off as much of the excess liquid as I could.


There's still going to be a lot of liquid - and this is why lean and extra cuts are recommended. You'll still get a fair amount of fat in the juices. Once you've cooked off as much liquid as you can without over browning the meat, take the pot off the heat.


Time to do something about all that liquid. I started off with somewhat less breadcrumbs that the recipe would've worked out to for this much meat. Stir it in really well, then let the whole thing sit for about 10 minutes or so to let the breadcrumbs absorb the liquid.


Now, take a peak. There's still a bit of liquid in the meat. You really could leave it at this point, but we like our pies thicker.


At this point, I start adding flour - just a bit, to start with. Once again, stir it up really well, then let it sit for another 10 minutes or so.


Now that's the way we like it! All the liquid is absorbed. At this point, we covered up the pot and set it on the balcony to cool down. It was about -12C at the time, so that works out just fine for us.

After that, Dh and Youngest made the pastry, but I neglected to get an pictures of the process! Silly me.

The pastry needs to sit in the fridge for 2-3 hours, so we had a good long break before the real work began.


Dh is my resident expert tourtierre dough roller. ;-) Rolling the dough between two sheets of plastic really makes the job easier.


My job was to fill the bottom shells, then wet the edges with water. By then, Dh would be ready with the top.


All trimmed, crimped and ready for the oven!

Oh, and the green bits in the dough is parsley. We find it adds a really nice touch to the dough.

Our oven has room for two pies at a time. We just made sure to reverse them half way through the cooking time. Like many ovens, ours doesn't heat very evenly, and we could really tell from how the tourtierre browned, that one side was quite a bit hotter than the other.


One of the first finished tourtierre, cooling down while the next pair browned. At this point the entire apartment was smelling just heavenly!


All done!


Even though it was quite late by the time they were done, we just had to give them a taste - and wow, did they ever turn out delicious!

Mmmmm....


Best of all, these keep really well. Once they're cool, wrap them in foil or put them in big freezer bags and freeze a bunch. They make excellent gifts and potluck contributions. You can warm them in the oven without bothering to thaw them out first, either.

Enjoy!
:-D

Sunday, December 23, 2007

Merry Christmas

Wishing you all a very Merry Christmas, and a joyous and prosperous year in 2008.

"See" you after Christmas.
:-)

Tuesday, December 18, 2007

Tourtierre

We've been fighting off some pretty nasty colds for a while, so things have been quiet around here - unless you count the sounds of coughing and nose blowing! Time to slowly catch up on things.

Part of our Acadian Christmas tradition is the tourtierre, a type of meat pie. Every family seems to have their own version of it. Here's a recipe from Mdm Benoit that's the foundation of the secret recipe I inherited from my MIL. (I highly prize my Mdm Benoit cookbooks - if you find any, snap them up! My favorite is Mdm Benoit Cooks at Home.)

First, the filling (quantities for 1 pie).

Quebec Tourtierre

1 pound minced pork
1 small onion, chopped
1 small clove garlic, minced
1/2 tsp salt
1/2 tsp savory
1/4 tsp celery pepper
1/4 tsp ground cloves
1/2 cup water
1/4 - 1/2 cup bread crumbs.

Place all the ingredients in a saucepan, except the bread crumbs. Bring to a boil and cook 20 minutes, uncovered, over medium heat, stirring often to heat up the meat. Remove from heat.

Add a few spoonfuls breadcrumbs [and stir in]. Let Stand 10 minutes. If the fat is sufficiently absorbed by the bread crumbs, do not add more. If not, continue in the same manner.

Cool and pour into a pastry-lined pie pan. Cover with pastry. Bake in a 500F oven until the top is well browned. Serve hot.

Note: Feel free to mix and match your ground meats. The original tourtierre were made using game birds and only changed to pork when it became common. You can also use things like potato flakes or flour in place of the breadcrumbs. Experiment with the herbs, too. We've never found celery pepper, so we use ground celery and added our own pepper and other herbs and spices to taste.

The recipe is easy to increase - we've used as much as 38 pounds of ground meats, adjusting the other ingredients to match. The only increase that isn't necessarily proportional is the water and breadcrumbs, depending on what meats you use. At that amount, the filling was divided into a pair of roasters (actually, a single roaster with a lid that could also be used as a second roaster), each over a pair of elements on the stove. With careful stirring and occasional reversing of the roasters, they cook just fine. We'd then put them in my FIL's trunk to cool down for the night, then make the dough and bake the pies the next day. Obviously, that doesn't work if you don't live in a cold enough winter climate! ;-)

We also never baked them as such a high temperature!!! Usually, we could fit 3 or 4 pies in the oven at once, baking them at 350F until well browned, rearranging the pies half way through the cooking time.

Now for the crust, also from Mdm Benoit.

Hot Water Pie Crust

1/4 cup water
1/2 cup shortening
1 1/2 cups pastry flour
1/2 tsp salt
1/2 tsp baking powder

Bring water to a boil. Add shortening. Remove from fire and stir until smooth.

Sift, measure and re-sift flour with salt and baking powder. Combine mixtures. Stir until smooth.

Set in covered container in refrigerator for 2 -3 hours.

Note: This is NOT a flaky crust in any way, which is perfect for such a savory filling. We usually quadrupled this recipe. Using modern appliances makes it a lot easier, too. After boiling the water, we'd add it to a mixer bowl with the shortening and beat it with an electric mixer. We'd then put on the dough hook, then switch to the bowl of dry ingredients and let the machine to all the work. We also did just fine using all purpose flour, and even did half and half with whole wheat flour.

When making multiple recipes, divide the mixed dough into the number of portions you need for each top and bottom, then chill.

Another trick to make things easier - especially when making large numbers of pies - is to use a sheet of thick, clear vinyl. These can be bought off rolls at most fabric stores. The sheet we got was large enough to cut off a square somewhat larger than the width of the pie dough we'd be rolling. Place the larger sheet on your rolling surface, then dust with flour. Take one of your portions of dough and coat both sides with flour, then top it with the smaller piece of plastic. Roll dough to size. You can then use the plastic to help you move the dough onto the pie plate.

When the pie plates are filled and you're ready to add the top crust, wet the edges of the bottom half with water, first. After you've trimmed and crimped the edges, cut steam openings in decorative designs into the top.


Enjoy!

Saturday, December 01, 2007

Today's very short library day results

I think library day is going to be short for the rest of the year, actually. Either that, or we start bus hopping to another branch. There's construction going on in our usual branch, with the sound of jackhammers all day. It was there last week, though not as bad - at least from while on the first floor. Talking to one of the librarians before we left, I asked how much longer they'll have to put up with it, and was told probably to the end of the year! I was really feeling for them, I gotta tell ya. You could see the strain on their faces. While I was talking, another librarian slipped something onto the counter for her - it turned out to be a pair of ear plugs. Someone had gone and picked up ear plugs for everyone. I hope it helps!

We didn't return many books, having stocked up pretty well last time, though we did return all the dvd's. Youngest is down to one book, and she wants to finish that before she takes out more. Eldest did return almost all her books (she kept Creation, which she's finding very interesting), but only took out two.

Bad & Beautiful; Inside the Dazzling and Deadly World of Supermodels: This looks to be quite interesting - it's based on an undercover investigation by the author, described as an investigative writer, Ian Halperin.

European Architecture 1750-1890: This one is more descriptive than photographic, compared to the ones she took out before. There's enough for her to get more "notes" for her drawings.

I hadn't intended to pick anything up myself, but found three more anyways.

Shisha Mirror Embroidery; A Contemporary Approach: I've taken this one out before, but wanted to grab it for reference and ideas.

Romanian Point Lace: I have a set or craft books in storage that include directions for needle woven lace. I've been bouncing ideas around for edging on the set of decorations I need to finish, but couldn't remember. I thought this book might have what I was thinking of, but it turned out to be very different. It still has some techniques I wouldn't mind trying - but not for this year. ;-)

Ruskin Lace & Linen Work: This book turned out to have exactly what I was thinking of - except for the edging. The needle woven lace patterns are for filling cut out squares and bands, but when it came to the edges, there was only one type shown. Ah, well. I'll figure something out.

After that, I picked up some dvd's I had on hold, and we quickly grabbed a few more before making our escape from the jackhammers.

Death Star; Space detectives solve the most powerful mystery in the universe: This video, from NOVA, covers the search for the cause of intense gamma ray bursts first detected in 1967.

Deep Blue: Youngest perked up when she saw the baby penguin on the cover of this one. *L* This dvd showcases the underwater world of the Antarctic.

Live in the Undergrowth: From the BBC, it looks to centre around insect life. Eldest was smitten by the photograph of an insect on the cover.

The Blue Planet; Tidal Seas and Coasts: We enjoyed the last disc we got so much, we want to see the rest of the series.

Cirque du Soleil; Alegria and Corteo. I haven't seen Alegria in years, on tv. I loved the music for it. Corteo, we haven't seen yet at all.

That's it for this week. :-)

.